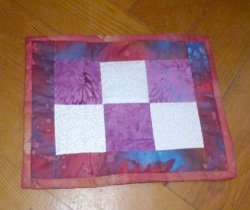
What do you when the weather is beautiful and sunny but you still want to do some quilting. In my case take a project or two outside. I've had the tops of these two mugrugs sewn for ages for had not got around to quilting or binding. Today was the perfect day for sitting in the garden and practicing a bit of hand quilting and sewing on a binding by hand. A productive day and enjoyable day.
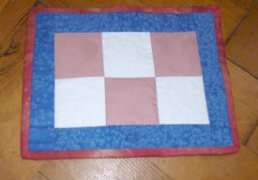
On a recent trip to the local quilt shop I bought a packet of fat 1/8ths that were just irresistible in the shop. When I got them home and opened them up I wasn't as fond of them as I had been in the shop. Nothing wrong with them but they no longer called my name. I knew that if I didn't do something with at least a couple of those fat 1/8ths straight away the whole packet would languish at the back of the stash making me feel guilty every time i laid eyes on it.
I decided I might as well use the fabric to practice some techniques that either I am not very good at or had never even tried before. Out came the Accuquilt Go! and the 1.5" strip cutter. I cut three of the fat 1/8ths into strips and then sewed together the strips in a light/dark/light sequence. After careful pressing I checked the width at several place down the strips and they remained 3.5" all the way down.
Next out with the rotary cutter to subcut those strips into squares. A few minutes later and I had lots of lovely 3.5" squares.
The next challenge was to sew all those squares together into an 18" x18" square while keeping all the points matching. The beige fabric is actually two different fabrics, one with red highlights and one with black highlights, making sure I kept the sequence correct meant a lot of concentration but I did it.
Then onto free motion quilting, I'm always nervous before attempting to FMQ but this time I just put the fabric under the machine and went for it!
The quilting is easier to see on the back and I'm not too disgruntled with it. Every time I try FMQ I get a little bit better at it, just need to find more time to practice.
The last thing to do was add the binding. Usually I'm very traditional (stuck in a rut) when it come to binding, it's 2.25" wide, folded in half, machined from the front and hand stitched on the back. As everything else was experimental I thought I might as well try something new with the binding. I cut the binding strip at 1.5" and sewed it single fold at a very scant 1/4" to the front of the quilt. Wrapped the binding over to the back ,folded it in half and pinned it in place, then using the machine very carefully stitched in the ditch from the front of the quilt to finish binding. For small items like this mini quilt which will end up on the coffee table or mug rugs or place-mats that are likely to be in and out of the washing machine frequently this technique gives a sturdy finish but it's not as neat and unobtrusive as a hand sewn binding, but then maybe a bit more practice will help solve that problem.
Because I hadn't invested a lot of time and effort or my favourite fabric into this project I was a lot more willing to tolerate things going wrong which meant I was a lot more relaxed about the whole process and less things did go wrong. It has reminded me of the value of just playing and practicing with fabric and the sewing machine without having any real expectations of the end product and somehow I managed to end up with a lovely little table topper.
 RSS Feed